Ranthambore National Park is one of India’s top wildlife destinations, especially for tiger photography. Whether you’re a professional photographer or someone venturing into the world of wildlife photography for the first time, the park offers an unmatched blend of landscapes, diverse species, and thrilling encounters. And if you’re one of those First-Time Ranthambore Safari Travelers, this guide will walk you through everything you need to know—step by step—to plan a successful photography trip.
Let’s dive deep into creating the ultimate Wildlife Photography Tour in Ranthambore National Park.
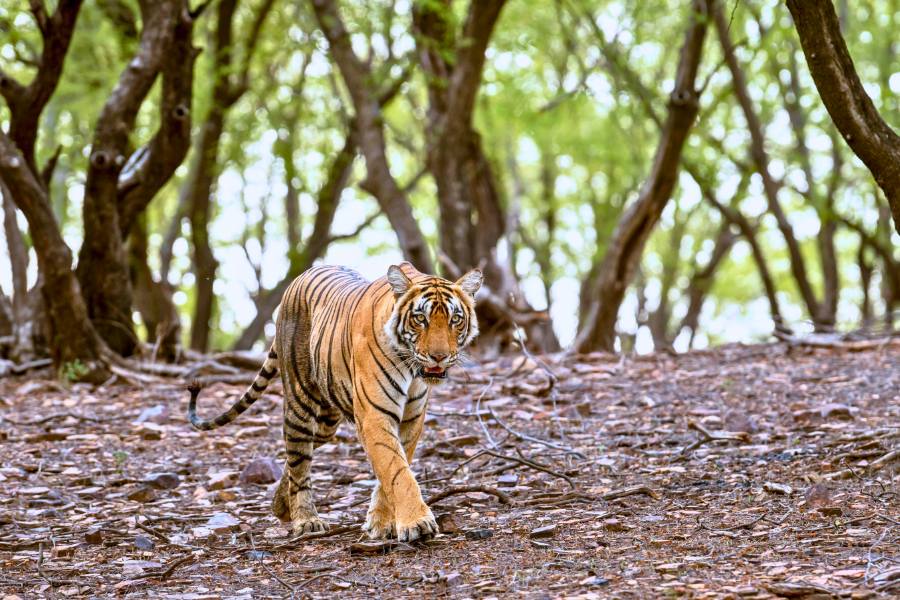
Understanding Ranthambore: A Photographer’s Paradise
Ranthambore isn’t just another wildlife park. It’s a magical blend of rugged cliffs, serene lakes, ancient ruins, and dense forest. Every corner seems to whisper a story, making it perfect for photographers.
Imagine capturing a tiger walking along a 10th-century fort wall or a peacock dancing during sunrise. That’s Ranthambore for you—raw, unpredictable, and visually stunning.
The park is home to:
- Bengal tigers
- Leopards
- Sloth bears
- Crocodiles
- Hyenas
- Over 300 species of birds
Each element offers unique photographic opportunities, especially if you’re able to time your visit right.
Best Time to Visit for Wildlife Photography
Timing is everything. While the park remains open from October to June, each season offers something unique.
October to December – Lush and Green
Right after the monsoon, the park looks vibrant. Light is soft, perfect for creating dramatic images. Animals may be harder to spot due to dense foliage, but the scenery itself is breathtaking.
January to March – Balanced Conditions
This is considered one of the best periods. Temperatures remain cool, animal movement increases, and lighting becomes crisp. For First-Time Ranthambore Safari Travelers, this window often feels comfortable and rewarding.
April to June – Peak Tiger Season
This is when the heat pushes animals toward lakes and water holes. Tiger sightings skyrocket. However, be prepared for extreme temperatures—perfect for those seeking powerful, intense wildlife shots.
How Many Days Do You Need for a Photography Tour?
If you want to truly experience Ranthambore’s beauty, plan for at least 3–5 days.
Here’s why:
- Wildlife sightings vary daily
- Each zone offers a different backdrop
- Lighting changes drastically each day
- More safaris = more opportunities for rare encounters
Remember: even the most experienced photographers can go days without spotting a tiger. Patience is part of the adventure.
Choosing the Right Safari Zone
Ranthambore has multiple safari zones, each with its own personality.
Zones 1–5: The Classic Tiger Zones
These zones are well-known for consistent tiger sightings. They include lakes, cliffs, caves, and forest paths that create stunning photographic compositions.
Zones 6–10: Less Crowded, Great Landscapes
Recent years have shown that these zones also offer great tiger sightings, along with more open landscapes and fewer vehicles—perfect for wide-angle shots. Many First-Time Ranthambore Safari Travelers think the early zones are superior, but experienced photographers often prefer the later ones for creative compositions.
Gypsy or Canter—Which is Better?
You get two safari vehicle options:
Gypsy (6-seater)
- More flexible
- Better angles
- Quieter
- Ideal for photography
Canter (20-seater)
- Budget-friendly
- Higher vantage point
- Less maneuverable
If you’re serious about photography, choose a Gypsy. It allows you to move freely, adjust your angle quickly, and position yourself better for wildlife shots. A Wildlife Photography Tour in Ranthambore National Park is much more enjoyable this way.
How to Book Your Safari
- Booking your safari early is crucial. Here’s the simplest approach:
- Visit the official Rajasthan forest department website.
- Select your dates and preferred zones.
- Choose your vehicle (Gypsy recommended).
- Make payment and download your permits.
Permits get booked out fast—especially during peak seasons. For First-Time Ranthambore Safari Travelers, it’s wise to book 45–60 days in advance.
What Camera Gear Should You Bring?
You don’t need the most expensive gear to capture stunning wildlife images. But having the right essentials certainly helps.
Essential Gear
- DSLR or mirrorless camera with fast autofocus
- Telephoto lens (200–600mm) for close wildlife shots
- Wide-angle lens (24–70mm or 16–35mm) for landscapes
- Extra batteries (safaris drain them quick)
- High-speed memory cards
Recommended Accessories
- Lens cleaning kit
- Beanbag for stabilizing the camera in Gypsy
- UV and ND filters
- Portable backup drive
If you’re one of the First-Time Ranthambore Safari Travelers, don’t overpack—carry only what you’ll actually use during a bumpy 3-hour safari. A proper Wildlife Photography Tour in Ranthambore National Park requires smart packing.
Photography Techniques for Stunning Shots
1. Understand Light
Ranthambore’s lighting changes dramatically throughout the day. Early morning and late afternoon are pure gold.
2. Anticipate Animal Behavior
Some tips:
- Tigers love shade near lakes
- Birds flock around water bodies
- Sloth bears come out early morning
- Crocodiles bask during afternoons
Learning patterns will help you frame shots better.
3. Keep Your Shutter Speed High
Wild animals move unpredictably. Stick to:
- 1/1000s or faster for tigers
- 1/2000s for birds
- Lower speeds only for landscapes or still animals
4. Composition Is Everything
Use leading lines, foreground elements, and natural frames like trees or ruins.
5. Be Patient
The best wildlife photography is a waiting game. You might sit for hours without action, and then suddenly—magic happens. A Wildlife Photography Tour in Ranthambore National Park rewards patience immensely.
Ethical Wildlife Photography
It’s not just about getting the shot—it’s about respecting wildlife.
- Never provoke animals.
- Keep noise to a minimum.
- Don’t litter.
- Follow your guide’s instructions.
- Respect the jungle, and it rewards you.
Where to Stay in Ranthambore
You’ll find everything from budget stays to luxury resorts. The key is to stay near the park gates to reduce travel time.
- Wildlife resorts
- Tented camps
- Boutique hotels
- Eco-friendly lodges
Many accommodations offer photography workshops and expert naturalist guides.
Sample 3-Day Wildlife Photography Itinerary
Day 1
- Afternoon safari
- Sunset shoot near Padam Lake
- Review photos and charge gear
Day 2
- Morning safari in Zone 3 or 4
- Breakfast at resort
- Afternoon safari in Zone 6
- Night sky photography session
Day 3
- Morning safari focused on bird photography
- Visit Ranthambore Fort for landscape shots
- Depart with thousands of photographs
Tips for First-Time Visitors
Since this guide also focuses on First-Time Ranthambore Safari Travelers, here are valuable reminders:
- Safaris are bumpy—hold your gear tight
- Follow your guide’s instructions carefully
- Don’t switch seats during animal sightings
- Always keep your camera ready
- Carry water, sunscreen, and a light jacket
These small things make a big difference in your overall experience.
Final Thoughts
Planning a wildlife photography tour in Ranthambore National Park isn’t difficult—it just requires attention to timing, gear, and preparation. Whether you’re chasing the perfect tiger shot, exploring scenic landscapes, or simply immersing yourself in nature’s beauty, Ranthambore offers endless opportunities.
Even First-Time Ranthambore Safari Travelers can walk away with unforgettable images and memories. The jungle has its own rhythm—slow down, observe, and let it surprise you.